PhotobucketPhotobucketPhotobucketPhotobucketPhotobucketPhotobucketPhotobucket

Wednesday, December 28, 2011

Button Bracelets

First things first........  I want to welcome everyone that came by, liked what they saw and became a follower!  I planned a slow entry into this world but as most plans go they never go as planned!  I have 'met' some great people and found some awesome new blogs that I can't wait to read through.

Now, if you are one of those people you have been warned.  I do love buttons!! 

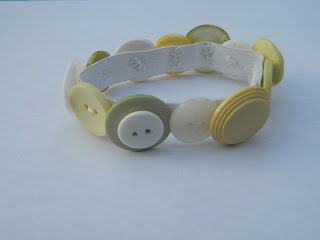
I don't have pictures of the process but basically I measured 1/2 elastic and sewed the ends.  When I say sew you will quickly realize that means a needle and thread. (Side note, I do have a machine but we haven't quite fallen in love yet.) For future ones I would recommend 1/4 inch.  It will get this job done and not limit how big your buttons have to be.

Then I just picked out buttons, choose a starting place and went for it.  I tried to place them so that they 'layered' and didn't expose the elastic.  When I had the elastic fully covered I came back with some smaller ones and but another button on top. 

This is the first one I made:


After seeing it my college age daughter wanted one too so on Christmas Eve I finally got it done!


The inside isn't exactly attractive but the outside is adorable.  A little time consuming, I think it took me about an hour and a half but something to do while sitting in front of the TV.

If anyone gives it a try I would love to see what you come up with!

Thanks for stopping by!!!!

Click here to check out the places I party!
Saturday, December 24, 2011

Santa came early................

Best.Fiance.Ever!!!!!!

And he even got me the tripod!! Finally!! Pictures that aren't taken on my iphone.  And this time I PROMISE to read the manual and figure this thing out!

Wishing everyone a very Merry Christmas!!!!!!!!!!!!

Tuesday, December 20, 2011

Re-Purposed Advertising Magnets

I totally can not take credit for todays post.  A co-worker's fiance does this and I was like duh! what an easy and great idea!

First, before we have something along the lines of the great paint chip debate, this magnet came from the front of our local phone book.  They are on there every year.  And I don't plan on needing their services in the near future but if I did they have enough tv commercials to remind me who they are so I can look their number up on my iphone while waiting on the ambulance.


Now, that being said who doesn't use these to hold pictures on the fridge?  How about adhering the picture to it?  Less clutter and major practical!

Choose a picture:


And used mod podge to adhere it to the magnet.  Turns out this particular magnet is exactly 4" from top so I only had to trim the sides.  I didn't put a coat on top because I didn't think it would need it.


Brilliant idea Lauren!

On a side note did you know that a GE French Door Stainless Steel Fridge is only magnetic on the sides and not the front?  Nope, me neither!

Saturday, December 17, 2011

Christmas Tree and Santa Hat Button Headbands

Hang around here much and you will soon discover that I have a thing for hot glue, buttons, felt, headbands and jewelry in general. 

I made these headbands this afternoon but I can't take all of the credit for it.  My 8 year old loves to wander into my craft room and see my latest creation or what's in progress and giving me her opinion.  I joked the other night that I was going to hire her as my 'creative consultant' and she is taking the role very seriously!  Last night she mentioned it would be cool to put 'some of those buttons' on a headband and this is what I came up with.  She was very proud to model the final results.

I laid out my pattern and cut a form for it:


I then cut the felt around the paper and hot glued the buttons in place.  In retrospect I probably could have just trimmed the felt but I usually trace with a pen and it tends to bleed into the felt with the type I use.


Turned it over and hot glued a elastic headband and a piece of felt.


Love how it turned out!


Proud model.  Just ignore the hair, I have no clue what we have going on there.......


And of course I could not stop at one!


The possibilities are endless!  I want to try a snowman and maybe an ornament next.  I told my 'creative consultant' that she needs to get started earlier next year because I would have loved to make some for gifts and some for my Etsy shop!

Thanks for stopping by!

Check out the places I party here!


Friday, December 16, 2011

Chip Clip Storage Jar

I don't have any before pictures because I did this several months ago but I really think it can explain itself.......

I adore clips for chips, crackers, candy or basically anything in the pantry but the ones I had were big and bulky.  I had them in a square basket that didn't sit firmly anywhere in the pantry.  I had seen the pickle jar / candlestick combos all over blogland so I decided to put my own spin on one.

What I used:

Clean pickle jar
Dollar store candlestick
16 Clothes pins (There are only 8 in the jar now so it does hold alot)
Rust-oleum Aqua and Sun Yellow spray paint
Vinyl cut with my Silhouette


Spray painted the clothes pins and candle stick.  Added the vinyl "CLIP IT' to the jar and glued it to the candle stick with E6000.  Let everything dry and threw the clothes pins in.  Yeah, it does kind of explain itself.......

But the best part besides the fact it adds a really nice pop of color to my pantry is that fact that it takes up minimal space on the pantry room shelf!


Thanks for stopping by!

Check out the places I party here!

Wednesday, December 14, 2011

Busy, Busy and Really Busy

Haven't really had a chance to post or even get much done crafty.  Between work, school events, shopping and the holidays in general it has been crazy around here!

But I did get a nice surprise this week!  I am still in shock that she featured my peppermint wreath!  Jaime has the cutest blog, Polka Dots on Parade.  Go check it out! Love her blog design!


Speaking of blog designs another one of my favorite blog friends Lindsay, who you probably know from Artsy Fartsy Mama, also designs the most adorable blog designs (mine included).  Check her out at Happy Potamus Designs.  I gave her my likes and dislikes and she created my vision.  I changed NOTHING.  She is awesome to work with!

I also want to thank everyone that is clicking over from places I have linked up to and for those that are now followers.  I have never felt so welcome before!

Coming soon I will have tutorials for the following earrings I have been making.  They will be appearing soon in stockings of a few people related to me.


Sunday, December 11, 2011

Jingle Bell Candle Holder

I was online this morning when I came across a cute candle holder at Kohl's:

Very cute, right?  Well, a trip to Wal-mart, some spray paint and glue and I have my own!

What you need:

Package of jingle bells, around $2.50
Spray paint
Hot glue
Form to adhere to (I used a 4 1/2 inch glass plate)

The package that I got had both silver and gold bells and since I wanted three colors, one being silver, I divided them into three piles with one being all silver.  Makes sense, right?

Took the other two outside and spray painted. 


Note to self....... In the future use 2 pieces of newspaper and move a little further apart.  Had to re-paint some of the red ones.

Here they are all pretty and ready to be attached.  Please excuse the candles used, my candle holder will be getting the pretty white new candle it deserves.  And oh, please excuse the craft table mess too.......


I orginally planned to trace the candle and cut a cardboard or felt form but remembered that I had a glass holder in the cabinet.  I would think either of those would work as well.  Picked a color and started gluing.  Lucky for me it ended up being almost a perfect fit because I did not even think about measuring it out.


And again with a sad candle:


I absolutely LOVE how it turned out!  But, I will admit that I like the different sizes the original had but Wal-mart only had one size and I really didn't want to search for more or increase the project price.

I plan on picking more bells up after Christmas and maybe create a bigger one using a plate from the dollar store.

Thanks for stopping by!

Check out the place I party here!

Thursday, December 8, 2011

Paper Towel Headband Holder

I have my first 'official' craft show this weekend and have been racking my brain all week on how to display some of my headbands.  Just getting started at this I really don't want to have to invest more money until I see where it goes.

Found inspiration in my laundry room today.  Hey, a roll of paper towels is the perfect size to hold a headband!  Because that is how I have looked at everything this week.  The oatmeal container, the orange juice container, no staple has been spared the chance to get pretty with a headband!

Took two sheets of scrapbook paper, some tape and covered it up.  Works perfect and not something that I have to store when I am done!


All dressed up.........


And in case you are interested all are available in my shop here but if not listed just request and I can make any of the above!

Check out the places I party up to here!


Tuesday, December 6, 2011

Chicken Tetrazzini

My other half loves Turkey Tetrazzini, something I had until meeting him neither made or ate.  After several attempts this is what I have come up with.  Since I have never baked a turkey (which I have zero problem admitting!) I decided to try it with chicken breast.  The results are amazing and it is a dish I can easily work in once a month.

Chicken Tetrazzini

1 (16 oz) package uncooked thin spaghetti
1/2 cup butter
1/2 flour
3 cups chicken broth
2 cups half and half
2 1/3 cups fresh grated parmesan cheese (reserve 2/3 cup to the side)
4 cups cook chicken (I usually throw a few in the crockpot and cook during the day)


1. Preheat oven to 350 degrees.  Lightly grease a baking dish.  I have found that the deeper the casserole dish the better it is.
2. Cook and drain spaghetti.
3. Melt butter in a large saucepan over medium heat.  Stir in flour.  Mix in chicken broth and half and half.  Cook and stir until it begins to boil.  Stir in 1 2/3 cup parmesan cheese and remove from heat.
4. Add the cooked chicken and spaghetti.
5. Pour 1/2 of the mixture in your casserole dish.  Sprinkle 1/3 cup cheese over the top.  Pour remaining mixture in the dish and sprinkle the remaining cheese over the top.
6. Bake 1 hour in a preheated oven until the top is slightly browned.

A couple of notes........ Depending on how many people or how long we want to eat it I cut the above in half.  A half feeds two adults and 1 child dinner plus a nice size leftover portion.  Sometimes I add mushrooms and or green peas which gives it a nice color but I didn't have either on hand tonight when I made it.  Feel free to add more cheese between the layers.  I usually just grab a handful and sprinkle.

I promise, it is really good!


Linking up to:


Sunday, December 4, 2011

Peppermint Wreath

While decorating yesterday I realized that we don't have a Christmas wreath.  Huh? That either means we didn't have one last year or I got all you know you want to buy one in the after Christmas sales, threw it out and forgot.  I really want one made of ornaments but after pricing them yesterday, both the ornaments to make one or one already made, I just can't justify paying full price knowing in 4 weeks I can probably score one for 75% off.

Enter peppermints..........

I was at a craft fair the other day and a lady was selling the nice straw and green covered wreath forms for $1.  Yep, $1.  I don't know about you but I am lucky if I ever find any at Dollar Tree so I took the opportunity to stock up.  I picked up 2 bags of peppermints or star lights as they are sometimes called.  Spent a couple episodes of Army Wives unwrapping and hot gluing.  Sprayed it with clear acrylic coating, added a ribbon and hung it on the front door.  I highly recommend that unless you live somewhere really, really cold I would apply several coats of shellac or lacquer.  I haven't yet but will be since our front door gets a lot of direct sunlight and is black.

I love how it turned out.  Not sure about the shelf life until another Christmas but for less than $5 I think I can live with only using it one holiday season!


Check out the places I party here!